Simple 1-Layer Neural Network for MNIST Handwriting Recognition
In this post I'll explore how to use a very simple 1-layer neural network to recognize the handwritten digits in the MNIST database.
![]()
In my previous blog post I gave a brief introduction how neural networks basically work. In this post I want to apply this know-how and write some code to recognize handwritten digits in images.
Image Recognition
For the computer an image is just a collection of pixels with different colors. Whatever is actually in the picture is very very hard for a computer to identify.
Yet, state-of-the-art neural networks are already able to automatically identify faces, or describe the actual content of a photo.
In this post, I show how this is done using a much simpler problem to start with: recognizing handwritten digits in images. (A common practical use case for this problem is the automatic classification of handwritten ZIP codes in the mail.)
The MNIST Database
The Gold-standard in machine learning for handwritten digits is called the MNIST database, maintained by one of the most-cited experts in machine learning, Yann Lecun, who also happens to lead the machine learning endeavours of Facebook.
The MNIST database contains 70,000 standardized images of handwritten digits and consists of 4 files:
(1) A training set of 60,000 images:
1mnist-1lnn/data/train-images-idx3-ubyte
(2) The labels (correct answers) for the training set:
1mnist-1lnn/data/train-labels-idx1-ubyte
(3) A testing set of 10,000 images:
1mnist-1lnn/data/t10k-images-idx3-ubyte
(4) The labels (correct answers) for the testing set:
1mnist-1lnn/data/t10k-labels-idx1-ubyte
The idea is to train the neural network first using the training set, and then to switch off training and test the effectiveness of the trained network using the testing set.
Using prior known correct answers to train a network is called supervised learning which is what we're doing in this exercise.
Each MNIST image has a size of 28*28 = 784 pixels. Each pixel is provided as a number between 0-255 indicating its density. To keep things simple, we'll ignore the density (grey-scale) and treat each pixel either as ON or OFF (black-and-white).

To model a MNIST image in code we define an object (struct) called MNIST_Image containing the 28*28 integers [0,1]:
1typedef struct MNIST_Image MNIST_Image;
2
3struct MNIST_Image{
4    uint8_t pixel[28*28];
5};
The MNIST label is modeled as a single 8-bit integer:
1typedef uint8_t MNIST_Label;
Note: When opening the files you first and only once need to read each file's header in order to move the read pointer to the position of the first image. The file header contains information such as the number of images in the file and the respective width and height of each image.
 1struct MNIST_ImageFileHeader{
 2    uint32_t magicNumber;
 3    uint32_t maxImages;
 4    uint32_t imgWidth;
 5    uint32_t imgHeight;
 6};
 7
 8struct MNIST_LabelFileHeader{
 9    uint32_t magicNumber;
10    uint32_t maxLabels;
11};
Since the content of the MNIST file headers is not critical for the functionality of our neural network I don't go into further details here. I just want to briefly highlight that the values (maxImages, imgWidth,imgHeight, etc.) in the header are stored in reversed byte order and therefore need to be reversed back in order to use them. For more details on this you can check the MNIST homepage or my project code.
Designing the Network
Before we start coding the network, we need to consider its design. As the name of this post suggests we only want a single layer (no hidden layers, no deep learning).
Every neural network's structure is somewhat different, so we always need to consider how to best suit the particular problem to be solved.
The Input
As outlined above each MNIST image has 28x28 pixels and each pixel is represented as either a "1" (ON/BLACK) or a "0" (OFF/WHITE). The 28x28 matrix is converted into a simple 784-byte-long one dimensional input vector (containing 0s and 1s) and serves as the input to our neural network.

The Core
In my last blog post I explained what the basic unit of a neural network, the perceptron, looks like. It consists of a node with multiple (at least 2) inputs, a scalar 2 weights, and one output value. The output value is the cell's attempt to classify the respective input.

For recognizing a MNIST image a slightly bigger perceptron is needed, one with 2828=724 inputs [0,1] and 2828=724 connection weights [0-1].

In the code I modeled the perceptron as a cell as follows:
1struct Cell{
2    double input [28*28];
3    double weight[28*28];
4    double output;
5};
The Network Layer
A neural network by definition consists of more than just 1 cell. Since we want to recognize 10 different handwritten digits our network needs 10 cells, each representing one of the digits 0-9.

In the code the layer is simply modeled as an array of cells:
1struct Layer{
2    Cell cell[10];
3};
The Target (Output)
The target output is the binary representation of our desired output. Since our desired output (provided via the MNIST label file) is always a number between 0-9 the target output is modeled as vector of 10 values, each either 0 or 1.
In particular, the vector contains nine "0"s and only one "1" where the index of the one output that is switched ON ("1") represents our desired output value.
Example: If the MNIST image contains the digit "1" then our target output vector is modeled as
1{0,1,0,0,0,0,0,0,0,0} // Remember: arrays (and vectors) always start at 0
A target value of "9" would be modeled as an output vector of
1{0,0,0,0,0,0,0,0,0,1}
In the code the output vector is hence simply modeled as an array of 10 integer values:
1struct Vector{
2    int val[10];
3};
The Network Design
Adding all the above pieces together we'll end up with a network design like this:

Once we've finished designing our network structure we can now (almost) start training the network by feeding the MNIST images into it.
Initialize the Network
Before we start training we need to reset or initialize all values in the network layer.
All 3 components of a cell (perceptron) need to be reset:
11. Set all inputs to 0
22. Set all weights to a random value 0-1
33. Set output to 0
The respective code can look like this:
 1void initLayer(Layer *l){
 2
 3    for (int o=0; o<10; o++){
 4
 5        for (int i=0; i<(28*28); i++){
 6            l->cell[o].input[i]=0;
 7            l->cell[o].weight[i]=rand()/(double)(RAND_MAX);
 8        }
 9
10        l->cell[o].output = 0;
11    }
12}
Train the Network
The network is trained by looping through all 60,000 images and making the network classify each image. Its classification is then compared with the correct answer (given in the label file) and cell weights are adjusted according to the difference between the two (the error).
The training algorithm looks like this:
 11. Load a MNIST image and its corresponding label from the database
 2
 32. Define the target output vector for this specific label
 4
 53. Loop through all 10 cells in the layer and:
 6   1. Set the cell's inputs according to the MNIST image pixels
 7   2. Calculate the cell's output by summing all weighted inputs
 8   3. Calculate the difference between actual and desired output
 9   4. Update the cell's weights based on this difference (the error)
10
114. Get the layer's classification using the index of the highest output
12
135. Define the network's success rate by comparing classification and label
14
156. Go to (1) for processing the next image
Now, let's write the code for each of the steps above:
Load MNIST Image and Label
To load a MNIST image and its corresponding label we call two simple functions
1MNIST_Image img = getImage(imageFile);
2MNIST_Label lbl = getLabel(labelFile);
and implement them like this:
 1MNIST_Image getImage(FILE *imageFile){
 2
 3    MNIST_Image img;
 4    size_t result;
 5    result = fread(&img, sizeof(img), 1, imageFile);
 6    if (result!=1) {
 7        printf("\nError when reading IMAGE file! Abort!\n");
 8        exit(1);
 9    }
10
11    return img;
12}
13
14MNIST_Label getLabel(FILE *labelFile){
15
16    MNIST_Label lbl;
17    size_t result;
18    result = fread(&lbl, sizeof(lbl), 1, labelFile);
19    if (result!=1) {
20        printf("\nError when reading LABEL file! Abort!\n");
21        exit(1);
22    }
23
24    return lbl;
25}
Of course, before we can read anything we need to open both (image and label) files first and read their respective file headers to move the read pointer towards the position of the first image or label. If you're interested in the code for opening the files and reading the file headers check out the project code on Github. Since this is not important for the network's image recognition functionality I'll skip it here.
Define Target Output Vector
Next we want to define a binary output vector of the type
1{0,0,0,0,0,0,1,0,0,0}
for the particular label that we just loaded from the database. We call the function
1Vector targetOutput;
2targetOutput = getTargetOutput(lbl);
and implement it as follows:
1Vector getTargetOutput(int lbl){
2    Vector v;
3    for (int i=0; i<10; i++){
4        v.val[i] = (i==lbl) ? 1 : 0;
5    }
6    return v;
7}
Train the Network Layer
While the output vector above defines our target or desired output we need to calculate the network's actual output, compare the two and feed the error back into the system. This is called training the network.
With each image that the network is trained on its effectiveness (success rate) increases.
For each image we need to loop through all 10 cells and train them on this particular image:
1	// Layer l
2	// Image *img
3	// Vector targetOutput
4
5	for (int i=0; i < 10; i++){
6        trainCell(&l->cell[i], &img, targetOutput.val[i]);
7    }
Train a Cell
Each of the 10 cells in our neural network layer represents one of the digits 0-9.
As outlined in the algorithm description above our trainCell function needs 4 steps:
1void trainCell(Cell *c, MNIST_Image *img, int target){
2
3    setCellInput(c, img);
4    calcCellOutput(c);
5
6    double err = getCellError(c, target);
7    updateCellWeights(c, err);
8}
Set Cell Inputs
First, we need to set the cell's inputs to match the current image's pixels. I.e. our cell's input values should be the same 724 long sequence of 0s and 1s as the images's pixels.
1void setCellInput(Cell *c, MNIST_Image *img){
2
3    for (int i=0; i<(28*28); i++){
4        c->input[i] = img->pixel[i] ? 1 : 0;
5    }
6}
Calculate Cell Output
Mathematically each cell's output is calculated by summing all of its 724 weighted inputs.
1output = sum (input * weight)
Let's understand this in more detail. The input is binary [0,1] and the weight is scalar [0-1]. Thus, a cell's output would be somewhere in the range of [0-794]. The more pixels in an image are switched ON, the higher its output value.
The code to do this looks like this
 1void calcCellOutput(Cell *c){
 2
 3    c->output=0;
 4
 5    for (int i=0; i<(28*28); i++){
 6        c->output += c->input[i] * c->weight[i];
 7    }
 8
 9    c->output /= (28*28);             // normalize output (0-1)
10}
Please note that we need to normalize our output to enforce a value [0-1] instead of [0-794].
The logic behind is as follows: A cell's output can be regarded as its distance or closeness to being the target cell. I.e. the higher a cell's output the more likely the index of this cell represents the desired target output. Since the target output is provided via a binary vector, its value is always 1. Thus the closer the cell output is to 1 the closer this cell is to the target output.
Calculate Cell Error
Next, the calculated cell output is compared to the desired output and the difference between both is regarded as the cell's error.
Example: Let's say our MNIST image shows a "6", then our target output vector would look like this
1{0,0,0,0,0,0,1,0,0,0}
For nine of the ten cells the target output is "0", and only for one of the ten cells, i.e. for the correct one, the target output will be a "1".
1double getCellError(Cell *c, int target){
2
3    double err = target - c->output;
4
5    return err;
6}
For those cells where the target output is "0" (the incorrect targets) the resulting error will be negative, while for the one cell where the target output is "1" (the correct target) the error will be positive.
In this way the weights of the connections towards the incorrect cells will be reduced, while the weights of the connections towards the correct cell will be increased.
Update Cell Weights
In supervised learning we train the network by letting it know how far off its previous classification attempt was. The network then slightly adjusts its weights in order to reduce the error, i.e. in order to allow its next classification attempt move closer to the desired target.
The size of the incremental change is given to the network in the form of a constant which is normally called the LEARNING_RATE.
1void updateCellWeights(Cell *c, double err){
2	int LEARNING_RATE = 0.05;
3    for (int i=0; i<(28*28); i++){
4        c->weight[i] += LEARNING_RATE * c->input[i] * err;
5    }
6}
Classify Output
After we looped through and trained all 10 cells on the current image we can get the network's classification attempt by comparing the output values of all 10 cells.
The output of a cell represents the network's attempt to classify the inputs as representing a particular digit.
In the code I decided to use the term prediction rather than classification. The corresponding function
1int predictedNum = getLayerPrediction(l);
can be implemented like this:
 1int getLayerPrediction(Layer *l){
 2
 3    double maxOut = 0;
 4    int maxInd = 0;
 5
 6    for (int i=0; i<10; i++){
 7
 8        if (l->cell[i].output > maxOut){
 9            maxOut = l->cell[i].output;
10            maxInd = i;
11        }
12    }
13
14    return maxInd;
15}
What we're doing here is simply returning the index of the cell with the highest output. The logic behind is simple: since the correct answer, provided via the target output vector, is always represented as a "1", therefore the closer the output value is to "1" the more likely this cell models the right answer.
Calculate Success Rate
The network's success rate is defined as the ratio of correct answers to the total number of images processed.
Before we'll move on to train the network on the next image we update an error counter to keep track of how many digits "we missed" (classified incorrectly).
1if (predictedNum!=lbl) errCount++;
After running all of the 60,000 images we can calculate the layer's success rate which, for training and using my example code, is around 83%.
1// NUMBER_OF_IMAGES = 60000 for training or 10000 for testing
2successRate = errCount / NUMBER_OF_IMAGES * 100;
Done. That was pretty much it. The only thing remaining is testing.
Test the Network
After the network has been trained on 60,000 images we'll test it using another 10,000 images. The testing process is exactly the same as the training process, the only difference being we switch off learning, i.e. we do NOT update the weights but maintain their values deducted from training.
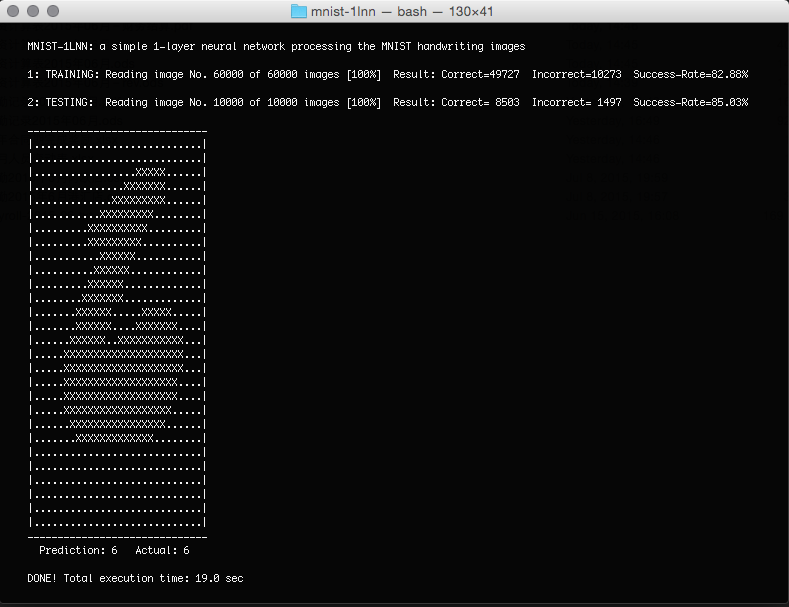
Our simple 1-layer neural network's success rate in the testing set is 85%. This value is embarrassingly low when comparing it to state of the art networks achieving a success rate of up to 99.97%. Given the simple algorithm of this exercise, however, this is no surprise and close to the 88% achieved by Yann Lecun using a similar 1-layer network approach.
Code & Documentation
You can find all the code for this exercise on my Github project page, including code documentation.
When I run it on my 2010 MacBook Pro it takes about 19 seconds to process all 70,000 images. And the only reason why it is so slow is that I'm rendering each image (using "." and "X") in the console while processing. (See above screenshot.) Once I switch the rendering off the program runs less than 10 seconds ... which is why I love C. :-)
Happy Hacking!
![]()